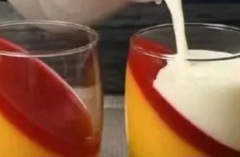
There are desserts that simply feel special—the kind that make you pause, admire the beauty on your plate, and savor every single bite. This delicate layered panna cotta is exactly that. With a silky, vanilla-scented custard, a vibrant mango puree, and a glossy red fruit layer, this dessert is a visual masterpiece served in elegant glasses. It’s light, refreshing, and perfectly balanced—not too sweet, not too rich, with just the right amount of tang from the fruit to cleanse the palate after a satisfying meal. The beauty of this panna cotta lies in its layers. Each component is carefully crafted and allowed to set separately, creating distinct ribbons of color and flavor that are as stunning to look at as they are delicious to eat. The mango layer is bright and tropical, the red fruit layer adds a burst of berry tartness, and the creamy custard layer ties everything together with its smooth, velvety texture. Served chilled in clear glasses, it’s a showstopper that looks like it came from a high-end restaurant—yet it’s surprisingly simple to make with just a few basic ingredients and a little patience. In this extended guide, I’ll walk you through every step of the process with extra detail and technique cues. You’ll learn how to work with gelatin for perfectly set layers, how to achieve that beautiful angled effect by tilting your glasses, and how to assemble and garnish this dessert for maximum visual impact. I’ll also share serving suggestions, storage tips, and answers to common questions. Let’s create something beautiful!Why You’ll Love This DessertThis layered panna cotta is a dessert that ticks all the boxes: it’s elegant, make-ahead friendly, and incredibly versatile. Here’s why it will become a favorite in your recipe collection:Visually stunning – The layered effect with mango, red fruit, and creamy white custard is simply gorgeous. When served in clear glasses, every layer is on display, creating a dessert that looks like edible art.Light and refreshing – Unlike heavy, dense desserts, this panna cotta is light and delicate. The fruit layers add brightness and acidity, while the custard is silky and airy, making it the perfect finish to a rich meal.Make-ahead friendly – This dessert needs at least 4 hours to set, which means you can prepare it well in advance of your dinner party or gathering. Simply chill it in the refrigerator and garnish just before serving.Naturally gluten-free – There’s no flour or gluten in this recipe, making it a great option for guests with dietary restrictions. It’s also easy to make dairy-free with a few simple substitutions.Perfect for any occasion – Whether you’re hosting a dinner party, celebrating a special occasion, or simply treating yourself, this dessert feels celebratory and special.IngredientsThis recipe uses fresh fruit, cream, and gelatin to create three beautiful layers. Each layer is made separately and allowed to set before the next is added, so plan ahead and give yourself plenty of time for chilling.For the Mango Layer2 ripe mangoes – Choose mangoes that are fragrant and slightly soft to the touch. They should yield gently when squeezed. Ataulfo (honey) mangoes are especially sweet and creamy, but any ripe variety will work.2 tablespoons granulated sugar – This enhances the natural sweetness of the mangoes without overwhelming their flavor. Adjust to taste depending on the sweetness of your fruit.1 tablespoon lemon juice – A squeeze of fresh lemon juice brightens the mango puree and adds a subtle tang that balances the sweetness.5 g gelatin – This is the setting agent for the mango layer. Use unflavored powdered gelatin for the most consistent results.For the Red Fruit Layer150 g strawberries or raspberries – Fresh or frozen both work well. If using frozen, thaw them completely and drain any excess liquid before blending.1 tablespoon granulated sugar – A small amount of sugar enhances the natural tartness of the berries. Adjust to taste depending on how sweet your fruit is.3 g gelatin – A smaller amount of gelatin is used here because this layer is thinner and sets more quickly.For the Creamy Custard Layer400 ml heavy cream – Also called heavy whipping cream. Use cream with at least 35% butterfat for the richest, silkiest texture.200 ml whole milk – Whole milk adds creaminess without making the custard too heavy. You can use a lower-fat milk, but the texture will be slightly less rich.80 g granulated sugar – This sweetens the custard layer just enough to balance the tartness of the fruit layers.1 teaspoon vanilla extract – Use pure vanilla extract or vanilla bean paste for the best flavor. The vanilla adds a warm, aromatic note that beautifully complements the fruit.8 g gelatin – This is the setting agent for the custard layer. The larger amount is needed because this layer is thicker and more substantial.For GarnishMango slices – Thin slices of fresh mango arranged on top of each glass add a professional, elegant finish.Optional extras – A few fresh mint leaves, a drizzle of mango puree, or a sprinkle of toasted coconut flakes can also be used to garnish.Recommended EquipmentClear dessert glasses or small bowls (6 to 8 glasses, depending on size)Blender or food processorSmall saucepans (at least two)Mixing bowlsWhiskMeasuring cups and spoonsFine-mesh strainer (optional, for straining fruit purees)Kitchen scale (for accurate gelatin measurement)Step-by-Step InstructionsFollow these detailed steps carefully to achieve perfectly set, beautifully layered panna cottas. The key is to work layer by layer, allowing each one to set completely before adding the next.1. Prepare the Mango LayerPeel the ripe mangoes and cut the flesh away from the pits. Place the mango flesh in a blender or food processor, add the sugar and lemon juice, and blend until completely smooth. The puree should be silky and vibrant in color. If desired, you can strain the puree through a fine-mesh strainer to remove any fibrous bits for an even smoother texture. In a small bowl, sprinkle the 5 g of gelatin over about 2 tablespoons of cold water. Let it sit for 5 to 10 minutes to bloom. The gelatin will absorb the water and become soft and spongy. This is an essential step—blooming the gelatin ensures it dissolves smoothly and evenly when heated. Gently heat the mango puree in a small saucepan over low heat until it’s warm, but not boiling. Remove from the heat and stir in the bloomed gelatin until it’s completely dissolved and the puree is smooth. Let the mixture cool slightly before pouring it into the glasses. To create the signature angled layer, tilt each glass at a 45-degree angle in a small bowl or a muffin tin to hold it in place. Carefully pour the mango mixture into each glass, filling them about one-third full. Place the glasses in the refrigerator and chill for at least 30 to 45 minutes, or until the mango layer is fully set and firm to the touch.2. Prepare the Red Fruit LayerWhile the mango layer is setting, prepare the red fruit layer. Wash the strawberries or raspberries and pat them dry. Place the berries in a blender with the sugar and blend until smooth. If you prefer a seedless texture, strain the puree through a fine-mesh strainer to remove the seeds. In a small bowl, sprinkle the 3 g of gelatin over about 1 tablespoon of cold water. Let it bloom for 5 minutes. Gently warm the fruit puree in a small saucepan over low heat until it’s just warm, then remove from the heat and stir in the bloomed gelatin until fully dissolved. Let the mixture cool slightly. Remove the glasses from the refrigerator. The mango layer should be firmly set. Pour a thin layer of the red fruit mixture over the mango layer—about half a centimeter thick is ideal. Return the glasses to the refrigerator and chill for another 30 to 45 minutes, or until the red fruit layer is fully set.3. Prepare the Creamy Custard LayerNow it’s time for the final layer—the creamy vanilla custard. In a medium saucepan, combine the heavy cream, whole milk, and sugar. Heat over medium heat, stirring occasionally, until the mixture is warm and the sugar has dissolved. Do not let it boil—you want it just hot enough to dissolve the gelatin. A gentle simmer is fine, but boiling can affect the texture of the gelatin and the final custard. In a small bowl, sprinkle the 8 g of gelatin over about 3 tablespoons of cold water and let it bloom for 5 minutes. Remove the cream mixture from the heat and stir in the bloomed gelatin until it’s completely dissolved. Add the vanilla extract and stir to combine. Let the custard mixture cool slightly—about 5 to 10 minutes—so it doesn’t disturb the layers beneath when you pour it. Then carefully pour the custard over the red fruit layer, filling each glass almost to the top. The custard layer should be the thickest, forming the main body of the dessert. Return the glasses to the refrigerator and chill for at least 4 hours, or until the custard is fully set and firm. For the best results, I recommend chilling overnight. This allows all the layers to meld together and the flavors to deepen.4. Garnish and ServeJust before serving, garnish each glass with a few thin slices of fresh mango arranged on top of the custard. You can fan them out for an elegant look, or simply place a few slices in the center. For an extra touch, add a small mint leaf or a sprinkle of toasted coconut flakes. Serve the panna cottas chilled, straight from the refrigerator. The layers will be beautifully set, with distinct lines of mango, red fruit, and creamy custard. Each spoonful delivers a perfect balance of flavors and textures—smooth, creamy, fruity, and refreshing.Tips for Perfect Panna CottaThese extra pointers will help you achieve flawless results every time.Bloom the gelatin properly: Always bloom your gelatin in cold water before adding it to warm mixtures. This ensures it dissolves evenly and prevents lumps.Don’t boil the cream mixture: When heating the cream and milk for the custard layer, keep it below a boil. Boiling can break down the gelatin and cause a grainy texture.Allow each layer to set fully: Patience is key! Make sure each layer is completely firm before adding the next. If you rush this step, the layers will bleed into each other and you’ll lose the beautiful distinct lines.Use fresh, ripe fruit: The quality of your fruit directly affects the flavor of the dessert. Choose mangoes that are fragrant and slightly soft, and berries that are bright and flavorful.Strain the fruit purees: For the smoothest, most elegant texture, strain the mango and berry purees through a fine-mesh strainer before adding the gelatin. This removes any fibrous bits or seeds.Chill overnight for best results: While 4 hours is the minimum setting time, overnight chilling allows the flavors to develop and the texture to become perfectly firm and creamy.Variations to ExploreOnce you’ve mastered the classic version, try one of these creative twists:Passion fruit layer: Replace the mango with passion fruit puree for a more tart, tropical flavor. Passion fruit pairs wonderfully with the creamy custard.Chocolate panna cotta: Add 100 g of melted dark chocolate to the custard layer for a rich, indulgent variation. Reduce the sugar slightly to balance the sweetness.Lemon or lime custard: Add the zest of one lemon or lime to the custard layer for a bright, citrusy note that pairs beautifully with the fruit layers.White chocolate custard: Melt 100 g of white chocolate into the cream mixture for a sweeter, more decadent custard layer.Berry variation: Use a mix of blueberries, blackberries, and raspberries for a more complex red fruit layer.Storage and Make-Ahead GuidanceThis panna cotta is the perfect make-ahead dessert. Once set, the glasses can be stored in the refrigerator for up to 3 days. Simply cover each glass with plastic wrap to prevent them from absorbing any unwanted odors. If you’re making this for a party, you can prepare the dessert up to 2 days in advance and keep it chilled. Add the garnishes just before serving to keep them looking fresh and vibrant. This dessert is not suitable for freezing, as the gelatin will break down and the texture will become watery and grainy upon thawing.Frequently Asked QuestionsQ: Can I use powdered gelatin instead of sheets? A: Yes, this recipe is designed for powdered gelatin. If you prefer to use sheet gelatin, you’ll need about 5 sheets (each sheet is roughly equivalent to 2 g of powdered gelatin). Bloom the sheets in cold water and use them according to the package instructions. Q: Can I make this dairy-free? A: Yes, you can substitute the heavy cream and milk with full-fat coconut milk or a plant-based cream alternative. The texture will be slightly different—coconut milk will add a coconut flavor—but the dessert will still set beautifully. Q: My panna cotta didn’t set. What went wrong? A: There are a few possibilities: the gelatin may not have been bloomed properly, it may not have been fully dissolved, or the mixture may not have been chilled for long enough. Make sure your gelatin is fresh and that you allow at least 4 hours for setting. Q: Can I use frozen fruit? A: Yes, frozen strawberries or raspberries work well. Thaw them completely and drain any excess liquid before blending to avoid watering down the puree. Q: How do I get the layers to be so straight and even? A: The key is to let each layer set completely before adding the next. Tilt the glasses for the first layer to create that beautiful angled effect, then keep the glasses upright for the remaining layers. Q: Can I use a different fruit for the layers? A: Absolutely. This recipe is very versatile. You can experiment with other fruits like peach, apricot, blueberry, or kiwi—just adjust the sugar to taste and use the same gelatin amounts. This layered panna cotta is the kind of dessert that feels like a celebration. With its beautiful colors, silky texture, and bright, refreshing flavors, it’s a showstopper that will impress your guests and leave them asking for the recipe. Enjoy every elegant, creamy spoonful! « `
Elegant Layered Panna Cotta with Mango and Red Fruit – A Light and Luxurious Dessert