
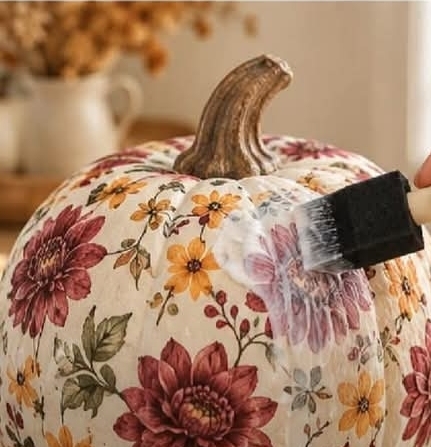
🍂 : Beautiful Fall Decor with Mod Podge
Turn an ordinary faux pumpkin into a gorgeous piece of autumn decor using patterned paper napkins and Mod Podge! 🎃 This simple craft is an easy way to decorate your home for fall without spending a lot of money.
With just a few inexpensive supplies, you can transform plain pumpkins into charming decorations featuring leaves, sunflowers, farmhouse patterns, vintage florals, or traditional autumn colors.
These decorative pumpkins look beautiful on a mantel, dining table, entryway, bookshelf, or Thanksgiving centerpiece. The best part? You can customize every pumpkin to match your home’s fall color scheme!
Materials You’ll Need
1 plain faux pumpkin (foam or plastic)
2–4 decorative paper napkins with your favorite fall patterns
Mod Podge, preferably Matte or Gloss
Foam paintbrush
Small scissors
Craft knife (optional, for adult use)
Acrylic paint in a coordinating color (optional)
Small piece of twine, ribbon, or raffia (optional)
Paper towels or a protective craft mat
Fine-grit sandpaper (optional, for suitable hard plastic pumpkins)
Craft tip: Choose napkins with a light background and attractive autumn designs. Pumpkins with leaves, sunflowers, acorns, berries, and warm fall colors work particularly well.
Step-by-Step Instructions
Step 1: Prepare Your Faux Pumpkin
Start with a clean, dry faux pumpkin.
Wipe away dust and dirt using a soft cloth. If the pumpkin has a shiny plastic surface, gently scuff it with fine-grit sandpaper if the material allows, then wipe away the dust.
If your pumpkin is dark or brightly colored, consider applying a coat of acrylic paint in cream, white, or another light shade.
Allow the paint to dry completely before continuing.
Why this matters: A light-colored base helps the napkin patterns show through more clearly, especially if the paper has a white background.
Step 2: Separate the Napkin Layers
Most decorative paper napkins contain two or three layers.
Carefully separate the printed top layer from the plain white layers underneath.
You will use only the thin, printed layer.
This step is important because thinner paper conforms more easily to the pumpkin’s curved surface and creates a smoother finish.
If the layers are difficult to separate, gently rub a corner between your fingers until the edges begin to lift.
Step 3: Cut or Tear the Napkins
Cut or tear the printed napkin into small pieces.
You can create:
Small squares
Narrow strips
Irregular pieces
Individual flowers or leaves cut from the design
Smaller pieces are generally easier to apply around the pumpkin’s curves and grooves.
Tearing the paper by hand can create softer edges that blend together more naturally than straight scissor cuts.
For a pumpkin covered in large floral patterns, you can also cut out individual motifs and arrange them before gluing.
Step 4: Apply a Thin Layer of Mod Podge
Using a foam brush, apply a thin, even coat of Mod Podge to a small section of the pumpkin.
Work on one area at a time rather than coating the entire pumpkin at once. This helps prevent the adhesive from drying before you position the paper.
Avoid applying too much Mod Podge, as excess moisture can wrinkle or tear the delicate napkin.
Step 5: Attach the Napkin Pieces
Place one piece of printed napkin onto the wet Mod Podge.
Using clean, dry fingertips or a very soft brush, gently smooth the paper from the center outward.
Work slowly to remove large air bubbles and wrinkles without tearing the napkin.
Continue adding pieces, slightly overlapping the edges where necessary to cover the pumpkin completely.
Follow the natural grooves of the pumpkin as you work. Allow the paper to settle into the indentations without pulling it too tightly.
Important tip: Napkin paper becomes fragile when wet. Avoid rubbing repeatedly over the same spot. If a small tear appears, simply cover it with another matching piece once the surrounding area has settled.
Step 6: Cover the Entire Pumpkin
Continue applying Mod Podge and attaching napkin pieces until the pumpkin is covered.
You can use the same pattern across the entire surface or mix several coordinating napkin designs for a more layered look.
For example, combine:
Cream napkins with orange leaves
Brown and gold botanical patterns
Sunflower prints
Vintage floral designs
Green leaves and small berries
At the stem, carefully trim or fold the napkin pieces around the base.
If you prefer a natural-looking finish, leave the stem uncovered.
Step 7: Let the Pumpkin Dry
Place the pumpkin on a protected surface and allow the Mod Podge to dry completely.
Depending on the amount of adhesive used, room temperature, and humidity, this may take several hours.
Avoid handling the pumpkin while the napkin paper is wet because it can tear or shift.
Once dry, inspect the surface and gently press down any loose edges with a small amount of Mod Podge if necessary.
Step 8: Apply a Protective Topcoat
When the napkin layer is completely dry, apply a thin coat of Mod Podge over the entire decorated surface.
Use gentle brush strokes and avoid repeatedly brushing over the same area.
Allow the topcoat to dry according to the product instructions.
For extra durability, you can apply a second thin coat after the first has dried completely.
A matte finish creates a soft farmhouse appearance, while a gloss finish gives the pumpkin a slightly shinier look.
Important: Mod Podge finishes vary in their water resistance. Unless you use a product specifically designed for greater moisture resistance, keep your decorated pumpkin indoors and away from water.
Step 9: Decorate the Stem
Once the pumpkin is fully dry, add a finishing touch to the stem.
Here are a few ideas:
Wrap the stem with natural jute twine.
Tie a small raffia bow around it.
Paint the stem brown, gold, or cream.
Add a narrow piece of rustic ribbon.
Leave the original stem untouched for a natural look.
Choose a finish that complements the napkin pattern rather than overpowering it.
Step 10: Display Your Napkin Pumpkin
Your beautiful DIY napkin pumpkin is ready!
Arrange it on a wooden tray with pinecones, dried leaves, candles, or miniature pumpkins for a cozy fall display.
You can also group several pumpkins of different sizes and patterns together to create a decorative centerpiece for your dining table.
For a coordinated look, repeat the same napkin design on pumpkins of different shapes and sizes.
🎃 Creative Napkin Pumpkin Ideas
- Farmhouse Pumpkin
Use white napkins with delicate brown leaves or simple botanical prints. Finish with a jute-wrapped stem. - Vintage Floral Pumpkin
Choose napkins featuring roses, small flowers, or faded botanical illustrations. A cream-painted base works beautifully with this style. - Sunflower Pumpkin
Use yellow sunflower patterns with green leaves. Add a natural twine bow for a cheerful autumn decoration. - Elegant Neutral Pumpkin
Choose napkins with beige, ivory, and soft brown designs. A matte finish creates an understated, elegant look. - Colorful Fall Pumpkin
Combine napkins featuring orange leaves, red berries, golden flowers, and brown branches for a traditional autumn appearance.
Tips for the Best Results
Use thin napkins. The printed top layer is easier to work with than thick paper.
Apply adhesive sparingly. Too much Mod Podge can saturate the napkin and cause tearing or wrinkles.
Work in small sections. This gives you more control and makes it easier to position each piece.
Choose a suitable base color. White or cream paint helps lighter napkin patterns remain bright.
Allow enough drying time. Rushing between coats can cause the paper to shift or become damaged.
Don’t worry about every wrinkle. A few tiny creases can add texture and character to a handmade fall decoration.
Keep the finished pumpkin indoors. This helps protect the paper, adhesive, and decorative finish from moisture and weather.
Frequently Asked Questions
Can I use real pumpkins instead of faux pumpkins?
You can decorate a real pumpkin using a similar technique, but its surface and natural moisture may affect how well the paper and adhesive adhere. A real pumpkin will also eventually soften and decay.
For a decoration you can reuse year after year, a faux pumpkin is generally the better choice.
Can I use any type of paper napkin?
Most decorative paper napkins work well, provided you can separate the printed layer from the backing layers.
Very thick, heavily textured, or glitter-covered napkins may be more difficult to apply smoothly.
How do I prevent wrinkles?
Use small pieces of napkin, apply a thin layer of adhesive, and smooth each piece gently from the center outward.
Some wrinkles are normal because the napkin must conform to a curved surface. Avoid trying to eliminate every crease while the paper is wet, as this can cause tearing.
Can I use another adhesive instead of Mod Podge?
A decoupage medium designed for paper crafts is the closest alternative. Other adhesives may not spread as evenly or provide the same finish, so test them on a small area first.
Can I make these pumpkins with children?
Yes! This is a fun seasonal craft for children with adult supervision.
Adults should handle any craft knives, while children can help separate napkin layers, choose patterns, and place the paper pieces.
Final Thoughts 🍁
Napkin pumpkins are a wonderful way to turn inexpensive faux pumpkins into beautiful autumn decorations.
With decorative paper napkins, a little Mod Podge, and some creativity, you can make unique pieces that complement your home’s fall decor without buying expensive seasonal decorations.
Make a single statement pumpkin or create an entire collection in coordinating patterns. Either way, this easy craft is a lovely way to welcome the autumn season!
🍂 Tell us in the comments: Which napkin pumpkin would you make?
A. Vintage floral 🌸
B. Sunflower and leaves 🌻
C. Neutral farmhouse 🤎
D. Traditional orange and gold 🎃
Save this idea for your next fall crafting afternoon!