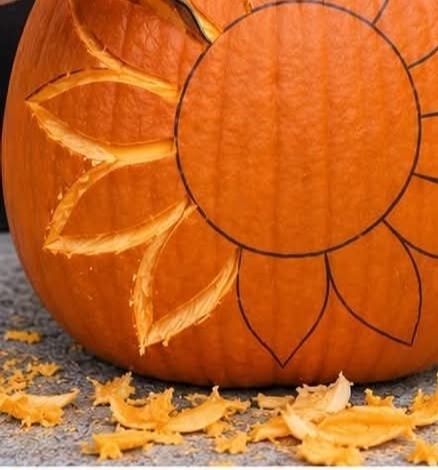
- 🌻 How to Make a Sunflower Pumpkin — Step by Step!Your picture shows a beautiful 3D sunflower-carved pumpkin! 🎃🌻 The petals are carved into the pumpkin’s surface, while the center is textured with small holes to create a glowing sunflower effect.Here’s how to make one at home.🧰 Materials You’ll Need
- 1 large, round pumpkin with a relatively smooth surface
- Black permanent marker or washable marker
- Small carving knife or pumpkin carving tools
- Sculpting loop tool or linoleum carving tool for shaping the petals
- Electric drill with a small drill bit (about 4–6 mm)
- Small spoon or pumpkin scraper
- Small paintbrush
- Brown or dark-brown acrylic paint (optional)
- LED candle or battery-operated pumpkin light
- Paper towels and a cloth
- Choose a large pumpkin with a broad, rounded front.
- Wipe the surface clean and dry it.
- Position the pumpkin so its flattest side faces forward.
- If you want to illuminate the pumpkin from inside, cut an opening at the bottom and remove the seeds and stringy pulp.
- Scrape away some of the inner flesh behind the front surface to make the pumpkin easier to carve.
- Center: Draw a large circle in the middle of the pumpkin.
- Petals: Draw approximately 12–16 long, pointed petals around the circle.
- Outer edges: Make each petal wider in the middle and pointed at both ends.
- Start with one petal near the top of the pumpkin.
- Use a small carving knife or sculpting tool to trace the petal’s outline.
- Carefully shave away the orange outer skin inside the petal.
- Remove thin layers of flesh to create a smooth, recessed surface.
- Leave the edges of the petal slightly raised so they catch the light.
- Repeat for every petal around the center.
- Keep the petal’s outer border raised.
- Make the middle slightly recessed.
- Shape the pointed tips carefully.
- Smooth the transitions between the raised edges and recessed centers.
- Keep the circular center intact.
- Draw several small dots inside the circle.
- Arrange the dots in slightly curved rows or a spiral pattern.
- Using a small drill bit, carefully drill shallow holes at the marked points.
- Vary the spacing slightly to create a natural seed pattern.
- Remove any loose pumpkin flesh around the holes.
- Use a small brush to apply dark-brown acrylic paint to the center.
- Carefully paint around the holes without filling them.
- Let the paint dry completely.
- Use a small sculpting tool to roughen the surface around the holes.
- Remove thin layers of flesh to create a textured appearance.
- Leave the surrounding petals smooth.
- Examine each petal from the front.
- Deepen the recessed areas slightly where needed.
- Smooth any rough cuts.
- Make sure the raised edges are visible.
- Remove loose pumpkin pieces and clean the carved areas.
- Place a battery-operated LED light inside the pumpkin.
- Turn off the room lights.
- Adjust the light’s position until the petals glow evenly.
- Check that the holes in the center allow light to shine through.
- A large, round orange pumpkin.
- Approximately 12–16 sculpted sunflower petals.
- Raised petal edges and recessed centers.
- A dark, textured circular center.
- Numerous small holes arranged in curved
How to Make a Sunflower Pumpkin — Step by Step