
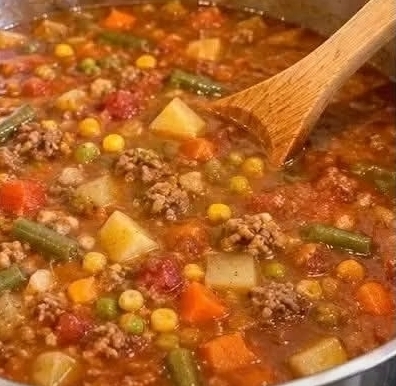
Hearty Homemade Hamburger Soup for Canning
There’s nothing quite like a homemade jar of Hamburger Soup waiting in the pantry! This hearty, comforting soup is packed with rich flavor, tender vegetables, and ground beef in every spoonful. It has that old-fashioned homemade taste that brings back memories of grandma’s cooking. Perfect for chilly evenings, busy weeknights, or whenever you need a warm and satisfying meal, this recipe for homemade hamburger soup is designed for both immediate enjoyment and long-term storage through canning.
Making your own beef vegetable stew for canning is a rewarding experience. Not only does it provide a delicious, ready-to-eat meal on demand, but it also allows you to control the ingredients and ensure the highest quality. This recipe emphasizes fresh produce and savory ground beef, creating a robust flavor profile that only gets better with time. Whether you’re new to food preservation or a seasoned canner, this guide will walk you through creating a batch of delicious, canned hamburger soup that your family will love.
Why You’ll Love This Homemade Hamburger Soup Recipe
- Comforting and Flavorful: A classic combination of ground beef and vegetables in a savory broth makes for a truly satisfying meal.
- Perfect for Meal Prep: Canning allows you to prepare large batches, making future meals quick and effortless.
- Economical: Utilize seasonal vegetables and bulk ground beef to create an affordable, nutritious meal.
- Customizable: Easily adapt the vegetables and seasonings to suit your preferences or what you have on hand.
- Shelf-Stable: Properly canned, this soup can be stored for extended periods, providing peace of mind and convenience.
Ingredient Notes for the Best Hamburger Soup
Using quality ingredients is key to a delicious beef vegetable stew. While the core ingredients remain consistent, here are some notes to help you select the best:
- Ground Beef: Opt for lean ground beef (80/20 or 90/10) to reduce excess fat. You’ll drain any fat after browning, but a leaner cut can contribute to a less greasy final product, especially important for canning.
- Potatoes: Russet or Yukon Gold potatoes work wonderfully, as they hold their shape well during cooking and canning. Dice them evenly for consistent texture.
- Carrots & Celery: Fresh, crisp carrots and celery add essential flavor and texture. Dice them to a similar size as the potatoes for even cooking.
- Yellow Onion: A staple for depth of flavor. Finely diced, it will meld seamlessly into the soup.
- Canned Diced Tomatoes: Choose high-quality diced tomatoes for a vibrant, slightly acidic base. Fire-roasted diced tomatoes can add an extra layer of smoky flavor if desired.
- Frozen Vegetables (Green Beans, Peas, Corn Kernels): Using frozen vegetables is convenient and they retain much of their nutritional value. Do not thaw them before adding to the soup; they will cook perfectly in the hot broth.
- Seasonings (Salt & Pepper): Adjust to taste. For canning, it’s often recommended to be mindful of salt, as flavors can concentrate. You can always add more when reheating. Consider adding a bay leaf or a pinch of dried thyme for extra aromatic complexity.
How to Make Homemade Hamburger Soup for Canning
This recipe is designed for both deliciousness and safe canning. Follow these steps carefully for the best results.
- Brown the Beef: In a large stainless steel pot or Dutch oven, brown the ground beef over medium-high heat. Break it apart with a wooden spoon as it cooks. Once fully browned, drain off any excess fat.
- Sauté Aromatics: Add the diced yellow onion, carrots, and celery to the pot with the browned beef. Sauté for 5-7 minutes until the vegetables begin to soften.
- Add Liquids and Tomatoes: Pour in the canned diced tomatoes (undrained) and an equal amount of water or beef broth. Stir well to combine.
- Introduce Potatoes: Add the diced potatoes to the pot. Bring the soup to a boil, then reduce heat to a simmer. Cover and cook for 15-20 minutes, or until the potatoes are tender-crisp.
- Stir in Frozen Vegetables: Add the frozen green beans, peas, and corn kernels to the soup. Continue to simmer for another 5-10 minutes, or until all vegetables are tender and heated through.
- Season: Season the soup generously with salt and pepper to taste. You can also add other desired seasonings like garlic powder, onion powder, or a dash of Worcestershire sauce.
- Prepare for Canning (Optional): If canning, ensure your canning jars and lids are sterilized and warm. Ladle the hot soup into the prepared jars, leaving 1-inch headspace. Remove air bubbles, wipe rims clean, and center the lids. Secure with bands to fingertip tight.
- Process Jars: Process the jars in a pressure canner according to USDA guidelines for your altitude and jar size (typically 75 minutes for pints or 90 minutes for quarts at 10 pounds pressure for a dial gauge canner, or 15 pounds for a weighted gauge canner, though always consult your canner’s manual). Allow the canner to depressurize naturally.
- Cool and Store: Once processed, remove jars and let them cool undisturbed on a towel for 12-24 hours. Check seals, then remove bands, wipe jars clean, label, and store in a cool, dark place.
Helpful Cooking and Canning Tips
- Even Dicing: For consistent cooking and an appealing presentation, aim to dice all your vegetables into roughly similar-sized pieces.
- Don’t Overcook Vegetables: If you plan to can the soup, remember that vegetables will undergo further cooking during the canning process. Aim for tender-crisp during the initial simmer to prevent mushy vegetables after canning.
- Pressure Canning is Essential: For low-acid foods like this beef vegetable soup, pressure canning is the only safe method to prevent spoilage. Do not use a water bath canner for this recipe.
- Headspace is Crucial: Maintaining the correct headspace (1 inch) in your canning jars is vital for proper sealing and to prevent siphoning during processing.
- Clean Jars and Rims: Always ensure your canning jars are clean and hot, and wipe the rims thoroughly before placing lids to ensure a good seal.
Ingredient Substitutions
- Ground Meat: Ground turkey or chicken can be used as an alternative to ground beef for a lighter version.
- Vegetables: Feel free to swap in other hearty vegetables like diced bell peppers, zucchini (add towards the end of cooking), or sweet potatoes.
- Broth: Vegetable broth can replace beef broth for a slightly different flavor profile.
- Tomatoes: Crushed tomatoes or tomato sauce can be used instead of diced tomatoes, though the texture will be smoother.
Variations for Your Hamburger Soup
- Spicy Kick: Add a pinch of red pepper flakes or a diced jalapeño with the onions for a little heat.
- Herbaceous: Incorporate fresh or dried herbs like oregano, basil, or bay leaves for added depth. Remove bay leaves before canning or serving.
- Grain Addition: For a heartier soup not intended for canning, you could add cooked pasta or rice during the last few minutes of simmering before serving. For canning, it’s generally best to avoid adding grains or pasta directly to the jars as they can swell and affect density, potentially leading to unsafe canning. Add them upon reheating.
Serving Suggestions
This hearty hamburger soup is a meal in itself! Serve it hot with a crusty piece of bread or warm rolls for dipping. A sprinkle of fresh parsley or a dollop of sour cream can add a nice touch. It’s also excellent alongside a simple green salad.
Storage and Reheating
- Canned Soup: Properly processed and sealed jars of canned beef vegetable stew can be stored in a cool, dark place for up to 1 year. Once opened, refrigerate any leftovers and consume within 3-4 days.
- Reheating: To reheat, simply pour the desired amount into a saucepan and warm gently over medium heat until simmering. You can also microwave individual portions.
- Freezing (if not canning): If you prefer not to can, the soup can be cooled completely and frozen in airtight containers for up to 3 months. Thaw in the refrigerator overnight before reheating.
Frequently Asked Questions
Q: Can I use fresh green beans, peas, and corn instead of frozen?
A: Yes, absolutely! If using fresh, ensure they are blanched or cooked until tender-crisp before adding to the soup, as their cooking time might differ from frozen varieties.
Q: Is it safe to can this soup in a water bath canner?
A: No, this is a low-acid food due to the meat and many vegetables. It must be processed in a pressure canner to eliminate the risk of botulism. A water bath canner is not safe for this recipe.
Q: Can I add pasta or rice to the soup before canning?
A: It is generally not recommended to add pasta, rice, or other grains to soup before canning. These ingredients can swell, absorb liquid, and change the density of the soup, which can affect heat penetration during pressure canning and potentially lead to unsafe processing.
Final Recipe Notes
Creating this homemade hamburger soup for canning is a fantastic way to stock your pantry with delicious, wholesome meals. The rich flavors and tender textures make it a family favorite, perfect for those busy days when you need a quick yet satisfying dinner. Enjoy the process of home canning and the comfort of knowing you have a hearty meal ready to go!
Ingredients
- 2 lbs lean ground beef
- 1 large yellow onion, diced
- 4 medium carrots, peeled and diced
- 4 celery stalks, diced
- 4 medium potatoes, peeled and diced
- 2 (28 ounce) cans diced tomatoes, undrained
- 8 cups beef broth or water
- 2 cups frozen green beans
- 1 cup frozen peas
- 1 cup frozen corn kernels
- Salt and freshly ground black pepper to taste
Instructions
- In a large stainless steel pot or Dutch oven, brown the ground beef over medium-high heat. Break it apart with a wooden spoon as it cooks. Once fully browned, drain off any excess fat.
- Add the diced yellow onion, carrots, and celery to the pot with the browned beef. Sauté for 5-7 minutes until the vegetables begin to soften.
- Pour in the canned diced tomatoes (undrained) and beef broth or water. Stir well to combine.
- Add the diced potatoes to the pot. Bring the soup to a boil, then reduce heat to a simmer. Cover and cook for 15-20 minutes, or until the potatoes are tender-crisp.
- Add the frozen green beans, peas, and corn kernels to the soup. Continue to simmer for another 5-10 minutes, or until all vegetables are tender and heated through.
- Season the soup generously with salt and pepper to taste. Adjust other seasonings as desired.
- If canning, ensure your canning jars and lids are sterilized and warm. Ladle the hot soup into the prepared jars, leaving 1-inch headspace. Remove air bubbles, wipe rims clean, and center the lids. Secure with bands to fingertip tight.
- Process the jars in a pressure canner according to USDA guidelines for your altitude and jar size (typically 75 minutes for pints or 90 minutes for quarts at 10 pounds pressure for a dial gauge canner, or 15 pounds for a weighted gauge canner). Always consult your canner’s manual for precise instructions.
- Once processed, remove jars and let them cool undisturbed on a towel for 12-24 hours. Check seals, then remove bands, wipe jars clean, label, and store in a cool, dark place.
- Prep time: 30 minutes
- Cook time: 45 minutes
- Total time: 1 hour 15 minutes
- Servings: 8-10 servings (or 3-4 quart jars)