
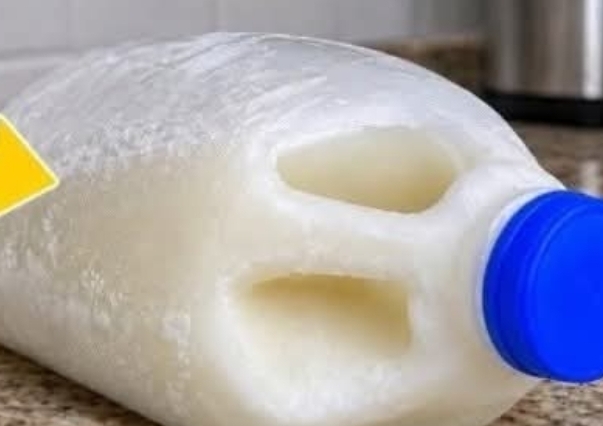
Have you ever opened your refrigerator and realized that a carton of milk was getting close to its expiration date, even though you still had plenty left? It’s a common household problem, especially when grocery shopping doesn’t always match your family’s daily needs. Fortunately, there is a simple way to preserve unused milk for later: freezing it correctly.
Freezing milk is a practical household technique that can help reduce food waste, make grocery planning easier, and save money over time. Instead of allowing perfectly usable milk to spoil before you have a chance to finish it, you can store it in the freezer and use it when needed.
This method is particularly useful for households that buy milk in larger containers, experience changes in daily consumption, or occasionally purchase more than they can use before the product’s recommended date.
It can also be convenient when you want to keep a reserve supply without making unnecessary trips to the grocery store.
However, freezing milk successfully requires more than simply placing a full container in the freezer. Milk expands as it freezes, and its texture may change when it is thawed. Choosing an appropriate container, leaving enough room for expansion, maintaining proper freezer temperatures, and thawing the milk safely are all important parts of the process.
The good news is that these steps are straightforward. With a little preparation, freezing milk can become an easy part of your everyday kitchen routine.
Whether you use regular cow’s milk, goat’s milk, or plant-based milk, understanding the basic principles of freezing and thawing can help you preserve your supply more effectively.
In this guide, we’ll explain the materials you need, how to prepare milk for freezing, where to store it, and how to thaw it properly while maintaining food safety.
Why Freezing Milk Is a Useful Household Trick
Milk is a common ingredient in many homes. It may be used for breakfast, hot drinks, baking, cooking, or simply enjoyed on its own.
Because it is so versatile, it is easy to assume that a large container will be finished quickly. But consumption doesn’t always follow a predictable schedule.
Some days, several people may use milk throughout the day. On other days, the container may remain nearly untouched.
When this happens, you may end up with more milk than you can reasonably use while it is still fresh.
Freezing provides a practical way to preserve some of that milk for later rather than allowing it to go to waste.
- Helps Reduce Unnecessary Food Waste
One of the main advantages of freezing milk is that it allows you to preserve a product that might otherwise spoil before you use it.
Milk is perishable, and its quality gradually changes during refrigerated storage.
If you realize that you won’t finish a container in time, freezing it while it is still fresh can help prevent unnecessary waste.
This doesn’t mean freezing can restore milk that has already spoiled.
Milk should be frozen while it is still safe and in good condition, not after signs of spoilage have appeared.
Freezing slows microbial activity and quality deterioration, but it does not make unsafe milk safe again.
- Makes Grocery Planning More Flexible
Another advantage is having more flexibility with your milk supply.
If your household uses different amounts from one week to another, keeping an appropriately stored frozen portion may help you avoid running out unexpectedly.
You can plan your grocery shopping with a little more confidence, knowing that some milk has been preserved for future use.
This can be particularly convenient when shopping trips are less frequent or when daily schedules make it difficult to visit the grocery store whenever a basic ingredient runs out.
- Can Help Save Money
Food waste adds up over time.
When milk is discarded because it spoils before being used, the money spent on that portion is lost.
Freezing milk while it is fresh may help reduce that expense.
The savings depend on your purchasing habits, how much milk you normally waste, and whether you use the frozen milk before its quality declines.
Although freezing is not a guarantee of lower grocery bills, it can be a useful strategy for households that regularly have leftover milk.
- Provides a Convenient Reserve
Frozen milk can serve as a backup supply when you don’t have enough fresh milk available.
For example, it may be useful for cooking or baking when your refrigerator supply is running low.
Knowing that you have milk safely stored in the freezer can make everyday meal planning more convenient.
However, because thawing requires time, frozen milk works best when you can plan ahead rather than expecting it to be ready for immediate use.
Can You Freeze Different Types of Milk?
The original method mentions three broad categories of milk: cow’s milk, goat’s milk, and plant-based milk.
All three may be frozen, but their texture and appearance after thawing can differ.
Understanding these differences helps you set realistic expectations and decide how to use the milk once it has thawed.
Freezing Cow’s Milk
Cow’s milk can be frozen when it is fresh and stored properly.
During freezing, some of its components may separate, particularly the fat.
After thawing, the milk may look slightly different from a freshly opened container.
Shaking the container thoroughly can help redistribute separated components and improve the consistency.
Even after shaking, however, the texture may not return completely to its original state.
This is a quality change rather than automatic evidence of spoilage.
Properly frozen and thawed cow’s milk can still be useful, especially in recipes where small changes in texture are less noticeable.
Freezing Goat’s Milk
Goat’s milk can also be preserved through freezing.
As with cow’s milk, its texture may change during storage and thawing.
Separation may occur, and the milk may need to be shaken after it has thawed completely.
Using a suitable container and maintaining safe storage temperatures remain important.
The milk should be fresh before freezing and handled carefully during thawing.
Freezing Plant-Based Milk
Plant-based milk alternatives may also be frozen, although their results are less predictable.
Different formulations contain different combinations of water, plant solids, oils, and stabilizers.
Because of this, some products separate considerably after freezing and thawing.
The texture may become grainy, watery, or less uniform than before.
Shaking can help with some products, but it may not completely restore the original consistency.
Checking the manufacturer’s storage recommendations is a useful precaution because some plant-based beverages are not recommended for freezing due to quality changes.
When texture changes are noticeable, thawed plant-based milk may be more suitable for cooking or baking than for drinking on its own.
Materials Needed for Freezing Milk Successfully
You don’t need expensive equipment or specialized kitchen gadgets to freeze milk.
The original method uses a short list of familiar materials that are easy to keep on hand.
Fresh cow’s milk, plant-based milk, or goat’s milk
Freezer-safe containers or suitable original plastic jugs with enough headspace
A permanent marker for dating labels
Each item serves a practical purpose.
The milk must be fresh and suitable for consumption before freezing.
The container must be capable of withstanding freezing temperatures and allowing the liquid to expand.
The permanent marker helps identify when the milk was placed in the freezer so you can manage your stored supply more easily.
Why Freezer-Safe Containers Matter
Not every container is designed to be placed in a freezer.
Milk expands as it freezes, which can place pressure on the walls and closure of the container.
If the container is unsuitable or filled too close to the top, it may leak, deform, or crack.
Choosing a freezer-safe container helps reduce these risks.
Some original plastic milk jugs may be suitable for freezing, but the specific packaging should be checked rather than assuming every jug will tolerate freezing conditions.
A container with adequate space for expansion is essential.
Why Labels Are Important
When you freeze food, it can be surprisingly easy to forget exactly when it was stored.
This becomes even more likely if several containers accumulate in the freezer.
Writing the freezing date directly on the container creates a simple reference point.
It also helps you identify older frozen milk so you can use it before newer portions.
Labeling takes only a moment, but it can make freezer organization much easier.
Step-by-Step Guide to Freezing Milk Correctly
The process begins with checking the container and ends with storing the milk in a consistently cold area of the freezer.
Following the steps in order can help preserve milk safely while minimizing problems caused by expansion, inconsistent temperatures, or poor organization.
Step 1: Inspect the Milk and Container
Before freezing anything, make sure the milk is still fresh and suitable for use.
Freezing should be used as a preservation method, not as a way to rescue milk that has already spoiled.
Check the container for damage, leaks, or signs that its contents may have been improperly stored.
Then determine whether the container is suitable for freezer storage.
If you’re using an original plastic milk jug, check that it can tolerate freezing temperatures.
The container should also have enough room to accommodate expansion as the liquid freezes.
Step 2: Leave Enough Headspace
One of the most important things to remember is that milk expands when frozen.
Placing a completely full container in the freezer can create unnecessary pressure as the liquid turns to ice.
The original instructions recommend pouring out approximately one cup of milk when using a full gallon-sized plastic jug.
This creates extra space near the top of the container.
However, the appropriate amount of headspace depends on the container’s size, shape, and manufacturer’s guidance. The one-cup suggestion should not be applied automatically to containers of every size.
The important principle is to avoid filling the container so completely that the expanding milk has nowhere to go.
This simple precaution helps reduce the risk of leaking or damage during freezing.
Step 3: Label and Date the Container
Once the container is ready, use a permanent marker to write the date on which you are freezing the milk.
Make the label clear enough that it can be read later without difficulty.
If you are freezing several containers, consistent labeling will help you identify which ones were stored first.
It can also be useful when evaluating how long a product has been in frozen storage.
Remember that freezing does not preserve peak quality indefinitely, even when the milk remains continuously frozen.
Keeping track of dates makes it easier to plan how you will use your supply.
Step 4: Place the Milk in the Freezer
After checking the container and labeling it, place the milk in the freezer.
The original method recommends storing it toward the back, where temperatures are often more consistent.
This can be a practical choice because areas near frequently opened freezer doors may experience greater temperature fluctuations.
The milk should be placed securely so the container remains stable.
Maintain the freezer at 0°F (-18°C) or below.
A consistently cold freezer helps preserve frozen foods and reduces unwanted temperature changes.
Avoid placing the milk in a position where the container could be knocked over or damaged.
Step 5: Allow the Milk to Freeze Completely
Once the milk is inside the freezer, allow it to freeze fully before treating it as part of your long-term frozen supply.
The time required depends on several factors, including the quantity of milk, the shape of the container, the freezer temperature, and how much other food is stored nearby.
A large jug will generally take longer to freeze than a smaller portion.
The important goal is consistent freezing rather than attempting to rush the process.
Keep the container properly stored and avoid unnecessary handling while it is freezing.
How to Thaw Frozen Milk Safely
Freezing milk is only part of the process.
Thawing it properly is equally important because milk is a perishable food that should be kept at safe temperatures.
The original method recommends transferring the frozen container into the refrigerator approximately 24 hours before you intend to use it.
This is a useful planning guideline, but it is not a guarantee that every container will thaw completely within that period.
Larger containers may require additional time.
Step 1: Transfer the Container to the Refrigerator
When you’re ready to use the frozen milk, remove the container from the freezer and place it in the refrigerator.
Refrigerator thawing allows the milk to warm gradually while remaining at a controlled, food-safe temperature.
Keep the refrigerator at 40°F (4°C) or below.
Unlike thawing on a countertop, refrigeration helps prevent the outside of the milk from becoming too warm while the center is still frozen.
This is an important consideration because large containers may thaw unevenly.
Step 2: Allow Enough Time
The original instructions suggest beginning the thawing process 24 hours before you plan to use the milk.
That may be sufficient for some portions, but a full jug can take longer.
The actual thawing time depends on the container’s size and the refrigerator’s temperature.
For this reason, planning ahead is helpful.
Rather than assuming the milk will be ready at an exact time, check whether it has completely thawed before trying to use it.
A partially frozen center can make shaking difficult and may prevent the milk from mixing evenly.
Step 3: Shake the Milk Thoroughly
Once the milk has completely thawed, shake the closed container thoroughly.
This step is especially important because freezing can cause fat and other components to separate.
After thawing, you may notice that the milk looks slightly uneven or that some components have collected in different parts of the container.
Shaking helps redistribute those components.
In many cases, the milk will become more uniform after mixing.
However, shaking may not fully reverse every texture change caused by freezing.
This is particularly relevant for some plant-based milk alternatives, which may remain grainy or separated.
Step 4: Check the Milk Before Using It
Before using thawed milk, check that it was stored and thawed safely.
Separation alone is not necessarily a sign of spoilage, since freezing can cause natural texture changes.
However, an unusual sour smell, obvious spoilage, or a history of improper storage are reasons not to use the milk.
Milk that was already spoiled before freezing should not be consumed after thawing.
Likewise, milk that has been left at unsafe temperatures should not be considered safe simply because it was previously frozen.
Why Milk Sometimes Looks Different After Freezing
One of the most common concerns about freezing milk is the change in appearance after thawing.
People sometimes expect the milk to look exactly as it did before freezing and become worried when they notice separation.
In many cases, these changes are related to the physical effects of freezing.
Fat Separation
Milk contains water along with fats, proteins, and other components.
When milk freezes, ice crystals form and can affect the distribution of these substances.
During thawing, some fat may remain separated rather than immediately returning to a uniform mixture.
That is why the original method recommends shaking the container thoroughly.
Changes in Texture
Frozen and thawed milk may appear slightly grainy or less smooth than fresh milk.
The extent of these changes depends on the type of milk and its composition.
Some products recover a relatively uniform appearance after shaking.
Others may remain noticeably different.
These changes can affect how enjoyable the milk is to drink, even when it has been handled safely.
Plant-Based Milk Can Separate More Noticeably
Plant-based beverages often contain emulsions or suspensions of plant-derived ingredients.
Freezing can disrupt their structure.
As a result, certain plant-based milks may separate into watery and thicker portions after thawing.
Shaking may improve the appearance, but it doesn’t always restore the original consistency.
If the texture becomes less appealing for drinking, using the milk in an appropriate cooked recipe may be an option, provided the product is still safe.
How Freezing Milk Can Help With Meal Planning
One of the most practical benefits of freezing milk is that it makes everyday food management more flexible.
Instead of relying entirely on the milk currently stored in the refrigerator, you can preserve some for future use.
This can be useful when grocery schedules, family routines, or cooking plans change unexpectedly.
When You Have More Milk Than You Need
Sometimes, a household purchases a larger amount of milk than it ends up using.
Perhaps breakfast routines change, someone is away from home, or fewer recipes require milk than expected.
Instead of waiting until the milk is close to spoiling, freezing a suitable portion while it is fresh can help prevent waste.
When You Want to Avoid an Extra Grocery Trip
Running out of a basic ingredient can be inconvenient, particularly when you’re preparing a recipe.
A frozen reserve can help with planning, although it must be thawed safely before use.
It works best as part of a planned routine rather than a substitute for immediately available fresh milk.
When You Frequently Cook or Bake
Milk is an ingredient in many homemade dishes.
If you regularly use it for cooking or baking, keeping an appropriately stored frozen supply may be helpful.
Texture changes that are noticeable when drinking thawed milk may be less apparent in certain cooked preparations.
The suitability of thawed milk depends on the specific recipe and the type of milk being used.
Common Mistakes to Avoid When Freezing Milk
Although freezing milk is simple, certain mistakes can affect its quality or safety.
Freezing a Completely Full Container
Milk expands as it freezes.
If there is no room for that expansion, the container may leak or become damaged.
Always provide appropriate headspace according to the size and type of container.
Using an Unsuitable Container
Not all plastic bottles or cartons are designed for freezing temperatures.
Use freezer-safe containers or original packaging that is suitable for the freezer.
Check for damage before storing the milk.
Forgetting to Label the Milk
Without a freezing date, it can be difficult to remember how long a container has been stored.
Clear labeling makes it easier to organize the freezer and use older milk first.
Freezing Milk That Has Already Spoiled
Freezing does not reverse spoilage.
Milk that is already unsafe should be discarded rather than frozen for later use.
Thawing Milk on the Counter
Leaving frozen milk at room temperature can allow the outer portion to become too warm while the center remains frozen.
Refrigerator thawing is the safer approach recommended in the original method.
Assuming Every Container Thaws in 24 Hours
The suggested 24-hour thawing period is not universal.
Large containers may need more time, so allow for variation.
Expecting the Texture to Be Identical
Freezing can change the texture of milk, especially plant-based alternatives.
Shake the container after thawing and remember that some separation may remain.
Frequently Asked Questions About Freezing Milk
Can Milk Really Be Frozen?
Yes. Many types of milk can be frozen when they are fresh and stored in appropriate containers.
However, texture changes may occur after thawing.
Does Freezing Milk Make It Last Forever?
No. Continuous freezing can preserve safety when milk has been handled correctly, but quality can decline during extended frozen storage.
Freezing also doesn’t make spoiled milk safe or eliminate the need for proper thawing and refrigeration.
How Long Can Milk Stay in the Freezer?
For best quality, many food-storage recommendations suggest using frozen milk within approximately three months, although the precise quality window varies by product.
Milk kept continuously frozen at 0°F (-18°C) or below may remain safe longer, but flavor and texture can deteriorate.
How Much Space Should I Leave in the Container?
The original method suggests removing about one cup of milk from a full gallon-sized plastic jug to allow room for expansion.
For other container sizes, follow the manufacturer’s guidance and leave sufficient headspace.
Can I Freeze Milk in Its Original Jug?
Some original plastic milk jugs can be frozen, provided the packaging is suitable and enough expansion space remains.
Not every jug is freezer-safe, so check the container before using it.
Can You Freeze Goat’s Milk?
Yes. Goat’s milk may be frozen using the same general principles of suitable containers, adequate headspace, consistent freezer temperatures, and safe refrigerator thawing.
Can You Freeze Plant-Based Milk?
Many plant-based milk alternatives can be frozen, but the results vary.
Some may separate or become grainy after thawing. Check the manufacturer’s recommendations for the particular product.
Why Should I Shake Milk After Thawing?
Freezing may cause milk fats and other components to separate.
Shaking helps redistribute them and can improve the consistency.
Can I Thaw Milk at Room Temperature?
Refrigerator thawing is recommended because it keeps the milk at a safer temperature during the thawing process.
Leaving it on a countertop can create food-safety risks.
How Quickly Should I Use Thawed Milk?
Keep thawed milk refrigerated and use it promptly. The original remaining freshness, storage history, and handling conditions matter, so freezing does not reset the milk’s shelf life.
If the milk was already nearing the end of its usable refrigerated life before freezing, it should not be treated as newly purchased milk after thawing.
Final Thoughts: A Simple Way to Reduce Milk Waste
Freezing milk correctly is a practical household habit that can help reduce unnecessary food waste and make grocery planning more convenient.
Whether you use cow’s milk, goat’s milk, or a suitable plant-based alternative, the basic principles remain straightforward.
Start with fresh milk.
Choose a freezer-safe container.
Leave enough room for expansion.
Label the container with the freezing date.
Store it in a consistently cold freezer.
And when you’re ready to use it, thaw it safely in the refrigerator before shaking it thoroughly.
Although freezing may change the appearance or texture of milk, it can still be a useful preservation method when the product is handled correctly.
The goal is not to make milk last indefinitely or eliminate every possible source of food waste. Instead, it is to give your household another practical option for managing food more efficiently.
Sometimes, saving money in the kitchen doesn’t require an expensive appliance or a complicated new routine.
It begins with understanding how to store the everyday ingredients you already buy.
And when it comes to milk, a suitable container, a little freezer space, and careful thawing can make a meaningful difference.