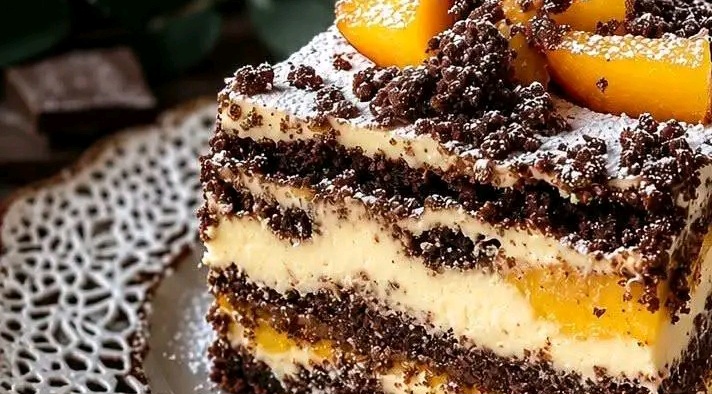
This showstopping dessert—often called Izaura Cake—brings together two beloved treats in one stunning pan: a rich, fudgy chocolate cake and a velvety, creamy cheesecake, all crowned with sweet peach slices and a delicate dusting of powdered sugar. The marbled effect isn’t just beautiful; it creates pockets of chocolate and cream in every bite, so each forkful offers a slightly different combination of flavors and textures. Whether you’re hosting a birthday celebration, a holiday gathering, or simply treating your family to a weekend baking project, this cake delivers both visual drama and deeply satisfying taste. The recipe comes together with common pantry ingredients and a straightforward method, but the result looks and tastes like it came from a high-end bakery. Baking this cake is as much about the process as the final presentation. The two batters are layered and gently swirled to create that signature zebra-like marbling, and the peaches add a bright, fruity contrast to the deep cocoa and tangy cream cheese. With a total bake time of just over an hour, the cake requires some patience while it cools, but that waiting period allows the flavors to meld and the structure to set properly. Serve it as the grand finale to a dinner party, or enjoy a slice with your afternoon coffee—either way, it’s sure to become a favorite in your dessert rotation.IngredientsFor the Chocolate Cake Layer250 g butter – Use unsalted butter for the best control over salt levels; if you only have salted, simply omit any added salt in the recipe. The butter should be at room temperature so it creams easily with the sugar, creating a light and airy base.1 cup sugar – Standard granulated white sugar works perfectly here, providing sweetness and contributing to the tender crumb of the cake layer.4 large eggs – Room-temperature eggs incorporate more smoothly into the batter and help create a uniform emulsion. If you forgot to take them out early, place them in a bowl of warm water for 5–10 minutes before cracking.2 cups all-purpose flour – Spoon and level your flour when measuring to avoid packing it down, which can lead to a dense, dry cake. A kitchen scale is even more accurate, but cup measurements work well if done carefully.3 tablespoons unsweetened cocoa powder – Dutch-processed cocoa gives a deeper, more mellow chocolate flavor, while natural cocoa offers a brighter, more acidic note. Either is fine; choose what you have on hand.1 teaspoon baking powder – This acts as the leavening agent, helping the chocolate layer rise to a tender, fluffy texture. Make sure your baking powder is fresh—test it by dropping a little into hot water; it should bubble vigorously.½ cup milk – Whole milk adds richness, but you can substitute 2% or even almond milk in a pinch. The milk should be at room temperature to prevent shocking the butter mixture.For the Cheesecake Layer1 kg cream cheese – Full-fat cream cheese is non-negotiable for that luscious, dense cheesecake texture. Use block-style cream cheese, not the spreadable kind from a tub, as the latter contains added air and stabilizers that can affect the final consistency. Let it come to room temperature completely before mixing.4 large eggs – These bind the cheesecake filling and give it structure. As with the cake layer, room temperature is key to a smooth, lump-free batter.¾ cup sugar – This amount gives the cheesecake a pleasant sweetness without overpowering the tangy cream cheese flavor.1 packet vanilla sugar – If you don’t have vanilla sugar, substitute with 1 teaspoon of pure vanilla extract and an extra teaspoon of granulated sugar. Vanilla sugar adds a lovely aromatic note that complements both the chocolate and the peaches.1 sugar-free vanilla pudding mix – This ingredient might seem unusual, but it acts as a stabilizer and thickener, giving the cheesecake a firm yet silky texture without adding extra sugar. Look for instant vanilla pudding mix (sugar-free) in the baking aisle.100 ml oil – Use a neutral-flavored oil like vegetable, canola, or sunflower oil. The oil adds moisture to the cheesecake layer, helping it stay creamy even after baking and cooling.½ cup milk – Again, whole milk is preferred for richness, but lower-fat options work in a pinch. This milk helps loosen the cream cheese mixture to a pourable consistency.For the Topping and Decoration1 peach (fresh or canned) – Fresh peaches in season are fantastic; they should be ripe but still firm so they hold their shape during baking. If using canned peaches, choose those packed in juice rather than heavy syrup for a more balanced sweetness, and pat them dry with paper towels before slicing.Powdered sugar, for dusting – This final touch adds a elegant snowy finish that contrasts beautifully with the dark chocolate and golden peach tones. Sift it over the cake just before serving for the prettiest presentation.Special EquipmentBaking sheet or jelly roll pan – A standard half-sheet pan (about 13×18 inches or 33×46 cm) works beautifully for this cake, giving you a thin, even layer that bakes uniformly. If your pan is smaller, the cake will be thicker and may need a few extra minutes of baking time.Parchment paper – Lining your pan with parchment is essential for easy release. Leave a little overhang on two opposite sides to use as « handles » for lifting the cake out after baking.Pudding mold or small dish – The recipe calls for a pudding mold filled with cocoa butter (essentially a small, greased dish). This is used to create a decorative indent or pocket in the top of the cake; if you don’t have a pudding mold, any small oven-safe dish or ramekin can serve the same purpose.Electric hand mixer or stand mixer – A mixer makes creaming the butter and beating the cream cheese much faster and more effective. A sturdy whisk and a lot of elbow grease can work, but a mixer is highly recommended for the smoothest results.Step-by-Step InstructionsBefore you begin, preheat your oven to 170°C (340°F) with both top and bottom heating elements on. Position the oven rack in the center so the cake bakes evenly. Lightly grease your baking sheet with butter or cooking spray, then line it with parchment paper, pressing it flat into the corners. Having everything measured and ready before you mix will make the process smooth and enjoyable.1. Make the Chocolate Cake BatterIn a large mixing bowl, combine the 250 g of room-temperature butter and 1 cup of granulated sugar. Using an electric mixer on medium speed, beat them together for about 3–4 minutes, stopping occasionally to scrape down the sides of the bowl with a rubber spatula. You’re looking for a pale, fluffy, and creamy mixture—this is the foundation of a tender cake. The sugar crystals should be mostly dissolved, and the color should lighten noticeably. Add the 4 large eggs one at a time, beating well after each addition. This gradual incorporation helps prevent the batter from curdling. Pour in the ½ cup of milk and mix until just combined; the mixture might look slightly separated at this point, but that’s perfectly normal. In a separate bowl, whisk together the 2 cups of all-purpose flour, 3 tablespoons of cocoa powder, and 1 teaspoon of baking powder. Sifting these dry ingredients together aerates them and ensures the baking powder is evenly distributed, which prevents bitter pockets of leavener in your finished cake. Reduce your mixer speed to low and gradually add the dry flour mixture to the butter mixture, mixing only until you see a smooth, uniform chocolate batter. Overmixing at this stage can develop gluten and make the cake tough, so stop as soon as the flour disappears. The batter should be thick but spreadable, with a glossy sheen from the butter.2. Assemble the First LayerSpoon about half of the chocolate cake batter onto your prepared baking sheet. Using an offset spatula or the back of a spoon, gently spread it into an even layer that covers the entire bottom of the pan. Don’t worry if it seems thin—the cake will rise during baking. Try to make the layer as uniform as possible so the cheesecake layer sits evenly on top.3. Make the Cheesecake FillingIn another large mixing bowl—preferably the bowl of your stand mixer or a deep bowl if using a hand mixer—place the 1 kg of room-temperature cream cheese. Beat it on medium speed for a minute or two until it becomes completely smooth and creamy, with no lumps. Scrape the bowl well, ensuring all the cream cheese is incorporated. Add the ¾ cup of sugar, the packet of vanilla sugar (or substitute), and the sugar-free vanilla pudding mix. Beat until the mixture is light and well combined, about 1 minute. Then add the 4 eggs, one at a time, mixing on low speed after each addition. Remember to scrape down the bowl frequently to keep the batter homogeneous. The eggs should be fully absorbed before you add the next one. With the mixer still on low, stream in the 100 ml of oil and the ½ cup of milk. Mix just until the liquids are incorporated and you have a smooth, silky cheesecake batter. It will be much thinner than the chocolate batter—this is correct, as it needs to flow easily over the chocolate layer. The addition of pudding mix and oil helps the cheesecake stay moist and set without cracking.4. Layer the Cheesecake and Remaining ChocolatePour the prepared cheesecake filling gently over the chocolate layer in the pan. It’s best to pour it slowly in a zigzag pattern across the surface, rather than dumping it all in one spot, to avoid disturbing the bottom layer. Use your spatula to lightly spread it into an even layer, but be gentle—you don’t want to mix the two batters completely at this stage. Now, take the remaining half of the chocolate cake batter and drop spoonfuls evenly over the top of the cheesecake layer. You can dot it across the surface in small mounds. Then, using a butter knife or the tip of a spatula, gently swirl through the layers to create a marbled « zebra » pattern. Pro tip: Drag the knife in a figure-eight or S-curve motion, moving through the pan without overworking the batters. The goal is to blend them slightly for a beautiful effect, not to make a uniform chocolate-and-cream mixture. For the decorative indentation mentioned in the original instructions, take a small pudding mold or oven-safe ramekin, lightly grease it with a bit of butter or cocoa butter, and press it gently into the top of the batter. This will leave a well that you can later fill with peach slices or simply use as a guide for placement. If you don’t have a suitable mold, you can skip this step and simply arrange the peaches on top without a defined indent.5. Add the Peach SlicesIf using a fresh peach, wash it, slice it in half, remove the pit, and cut it into thin wedges (about ¼-inch thick). If using canned peaches, drain them well and pat them dry with paper towels to remove excess moisture—this step is crucial because extra liquid can make your cake soggy. Arrange the peach slices artfully on top of the batter, gently pressing them down just slightly so they nestle into the surface. They will sink a little more during baking, which is exactly what you want.See more on the next pageAdvertisement←Previous pageNext page→6. Bake the CakePlace the baking sheet in the preheated oven and bake for 60–70 minutes at 170°C (340°F) with top and bottom heat. Because ovens can vary, start checking for doneness at the 60-minute mark. The cake is ready when the edges are set and lightly puffed, and the center has a slight jiggle—it should not be liquid or sloshy, but a gentle wobble in the very center is fine, as it will continue to set as it cools. A toothpick inserted into the chocolate portion (not the cheesecake center) should come out with a few moist crumbs, but not wet batter. If the top starts to brown too quickly, you can loosely tent a piece of aluminum foil over the pan for the last 10–15 minutes. During baking, your kitchen will fill with the comforting aromas of chocolate, vanilla, and toasted cream cheese. The cake may rise and then settle slightly—this is normal. Resist the urge to open the oven door frequently, as drafts can cause the cheesecake portion to crack.7. Cool CompletelyOnce the baking time is up, remove the pan from the oven and place it on a wire cooling rack. Allow the cake to cool completely in the pan—this is essential for the cheesecake layer to firm up properly. Cooling at room temperature for at least 1.5 to 2 hours is recommended. Do not try to speed this up by placing it in the refrigerator while warm, as sudden temperature changes can cause the cheesecake to crack or the texture to become dense. After it has cooled to room temperature, you can transfer the pan to the refrigerator for an additional 2–3 hours (or overnight) to fully chill. This step is optional but highly recommended, as it makes slicing much cleaner and allows the flavors to meld beautifully. The chocolate layer becomes fudgier, and the cheesecake sets to a perfect creamy firmness.8. Dust and ServeJust before you’re ready to serve, place the powdered sugar in a fine-mesh sieve and dust it generously over the top of the cooled cake. The white powder against the dark chocolate swirls and golden peach slices creates a stunning visual contrast that looks beautiful on any dessert table. Use a sharp knife to cut the cake into squares or rectangles; for the cleanest cuts, wipe the knife blade with a damp cloth between slices. Serve each piece on a dessert plate, and if you want to get fancy, add a small dollop of whipped cream or a mint sprig alongside. The cake is rich and satisfying on its own, so pair it with a cup of black coffee, a glass of cold milk, or even a dessert wine for a special treat.Serving and Plating IdeasThis marble cheesecake with peaches is versatile enough for any occasion. For a casual family dessert, cut it into generous 3-inch squares and serve on a large platter. If you’re hosting a more formal event, consider slicing it into thin, elegant rectangles and plating each with a drizzle of chocolate sauce or a pool of berry coulis. The combination of chocolate and peach is also wonderful with a scoop of vanilla or caramel ice cream on the side. For a beautiful brunch spread, serve smaller portions alongside fresh fruit and coffee. The cake’s not-too-sweet profile makes it a lovely choice for mid-morning gatherings, and the marbled pattern always draws compliments. You could even crumble a few pieces over a bowl of Greek yogurt for a decadent breakfast treat—though we won’t judge if you just eat it straight from the pan!Storage and Make-Ahead TipsRefrigeration: Store any leftover cake in an airtight container in the refrigerator for up to 5 days. The cheesecake layer must stay chilled to maintain its texture and food safety. Place a piece of parchment paper or plastic wrap directly on the cut surface to prevent it from drying out or absorbing other fridge odors. Freezing: This cake freezes wonderfully. Wrap individual portions tightly in plastic wrap, then place them in a freezer-safe bag or container. Freeze for up to 2 months. To serve, thaw overnight in the refrigerator and bring to room temperature for about 30 minutes before enjoying. Make ahead: You can bake this cake a day before you plan to serve it. In fact, it often tastes better the next day after the flavors have had time to meld. Keep it covered in the fridge, and dust with powdered sugar only right before serving to keep the decoration fresh and crisp.Pro Tips for the Perfect Izaura CakeRoom temperature is your friend: Always start with room-temperature butter, cream cheese, eggs, and milk. This ensures a smooth emulsion and a consistent bake. Cold ingredients can lead to lumpy batter and uneven texture.Don’t overmix the chocolate batter: Mix just until the flour disappears. Overworking the gluten will make the cake dense and tough rather than tender and fudgy.For the prettiest marbling: Use a light hand when swirling. The goal is a distinct zebra pattern, not a muddy brown mixture. Less is more—a few gentle figure-eight strokes are usually plenty.Avoid cracks: Cool the cake slowly at room temperature, and avoid placing it directly in the fridge while warm. If you’re worried about cracking, you can also run a thin knife around the edges of the pan as soon as it comes out of the oven to release the sides and allow the cake to contract evenly as it cools.Peach prep: If using canned peaches, make sure they are thoroughly drained and patted dry. Excess liquid can create wet spots and affect the cheesecake’s setting. Fresh peaches should be ripe but firm; overly soft peaches may break down too much during baking.Frequently Asked QuestionsCan I use a different fruit instead of peach?Absolutely! Nectarines, apricots, or even plums work beautifully as substitutes. Canned or fresh pineapple, mango, or pear slices also pair nicely with chocolate and cheesecake. Just make sure whatever fruit you choose is well-drained (if canned) and sliced thin enough to bake through without releasing too much moisture.What if I don’t have vanilla pudding mix?The sugar-free vanilla pudding mix serves as a stabilizer and thickener. If you don’t have it, you can substitute with 2 tablespoons of cornstarch mixed with 1 tablespoon of vanilla extract. The texture will be slightly less firm, but still delicious.Can I make this gluten-free?Yes, you can replace the all-purpose flour with a 1:1 gluten-free baking flour blend that contains xanthan gum. The texture may be slightly more delicate, so handle the batter gently. The pudding mix may also contain gluten, so check the label and use a certified gluten-free pudding mix if needed.Why did my cheesecake layer crack?Cracks often happen due to sudden temperature changes or overbaking. To minimize cracking, avoid overmixing the cheesecake batter (which incorporates too much air), bake at the stated temperature, and cool the cake gradually at room temperature before refrigerating. Running a knife around the edges immediately after baking also helps reduce tension as the cake contracts.How do I know when the cake is done?The edges will be set and slightly puffed, and the center will have a gentle jiggle—it should not be liquid. The internal temperature of the cheesecake portion should reach about 65–70°C (150–160°F). A toothpick inserted into the chocolate cake part should come out with a few moist crumbs, not wet batter. Enjoy your stunning Izaura Cake! This recipe is a celebration of contrasts—rich and creamy, chocolate and fruit, elegant and comforting. Share it with loved ones, and don’t forget to capture a photo of that gorgeous marble swirl before you dig in. « `
Marble Cheesecake with Peaches (Izaura Cake)